game cube hardware
Okay, so I’ve been messing around with this old GameCube I found in my attic. I was thinking, “What the heck is inside this thing?” So, I got my screwdriver and started taking it apart. It was like going back in time, you know? This thing is ancient in tech years!
Diving into the GameCube
First thing I did was flip it over and unscrew all those screws on the bottom. There were a bunch, and they were all the same size, which was nice. Didn’t have to worry about mixing them up. After that, the top part just popped right off. Pretty simple so far.
Inside, the first thing I saw was this big metal shield. I guess it’s there to keep things cool or maybe stop interference. Anyway, I unscrewed that too and took it off. Underneath, there was the disc drive – that’s the thing that spins the games. It was held in place with a few more screws, so I removed those and carefully lifted it out.
Getting to the Guts
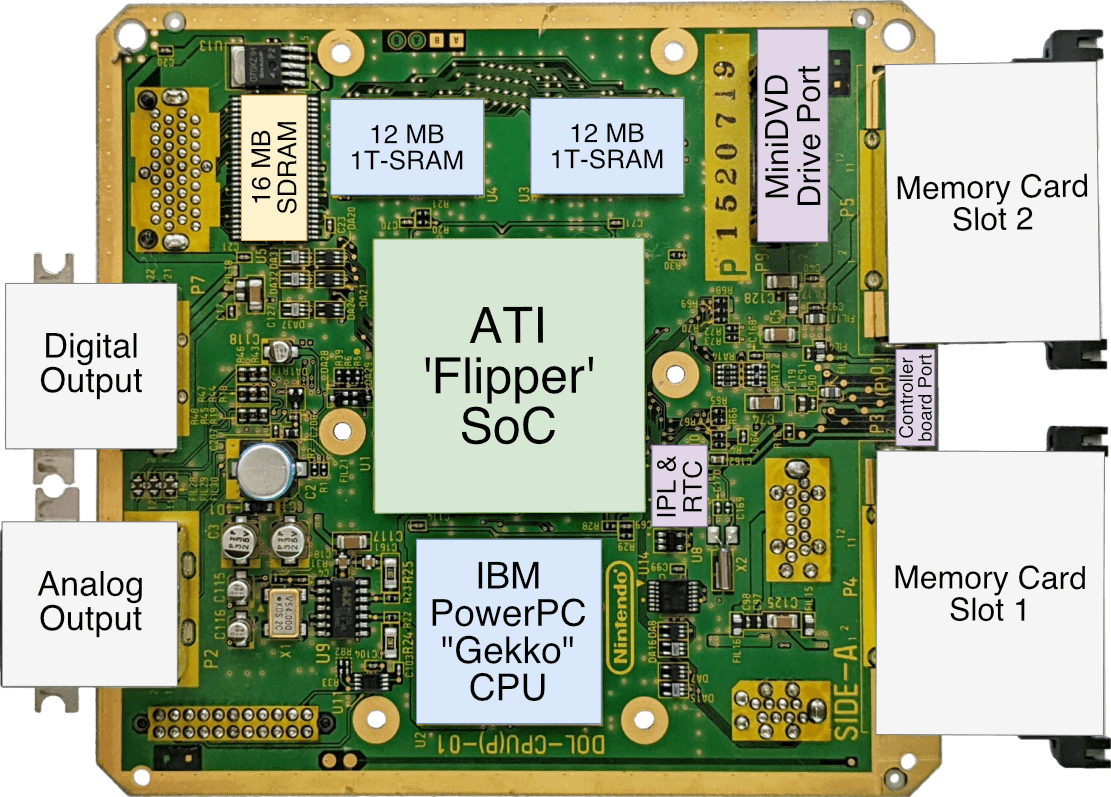
With the drive out, I could finally see the motherboard. That’s where all the important stuff is, like the brain of the console. It was covered by another metal shield, so guess what? More screws! I took that shield off too, and there it was, the heart of the GameCube.
The motherboard had all sorts of chips and things on it. There was this big one in the middle, which I figured must be the main processor. It had a heatsink on it – that’s a metal thingy that helps keep it from overheating. I didn’t mess with that too much because I didn’t want to break anything.
Exploring Further
I noticed there were some other parts connected to the motherboard, like the power supply and the fan. I unplugged those carefully. The fan was a little dusty, so I gave it a quick clean with a brush.
There were also these little boards connected to the front of the console. Those were for the controller ports and the memory card slots. I carefully disconnected those too. It was like solving a puzzle, figuring out what went where.
Putting It Back Together
After I had a good look at everything, I decided to put it all back together. I basically just did everything in reverse. Put the little boards back, plugged in the fan and power supply, screwed the motherboard shield back on, put the disc drive back in place, and finally, put the top back on and screwed it all shut.
And guess what? It still worked! I plugged it in, put in a game, and it fired right up. I was pretty proud of myself, to be honest. It was a fun little project, and I learned a lot about how this old console was put together. It’s pretty amazing how much tech they managed to pack into such a small box back then.
It’s not rocket science, but taking apart the GameCube and putting it back together was a blast. A trip down memory lane and a cool way to see how things were built back in the day. If you got an old console lying around, maybe give it a shot! You might be surprised at what you find and how much fun it can be. Just remember which screw goes where!