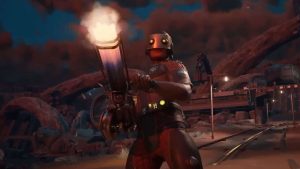
roblox hellmet outfit
Alright, so I’ve been messing around in Roblox again, and this time I wanted to make a cool “hellmet” outfit. You know, something that looks kinda tough and maybe a little bit scary. Here’s how I went about it, step-by-step.
Finding the Right Helmet
First things first, I needed a good base helmet. I spent a while just browsing the Roblox catalog, searching for things like “helmet,” “knight,” “armor,” even “demon” to see what popped up. I wanted something with a good shape, not too cartoony, but also not too plain.
I finally found one that looked pretty wicked – it had these kinda curved horns and a dark, metallic look. I think it was called something like “Helm of the Shadow Warlord” or something edgy like that. I bought it, and it was time to start customizing.
Adding Some Fiery Details
The helmet was cool, but I wanted to make it look more “hellish,” right? So, I started looking for accessories. I searched for “fire,” “flames,” “lava,” anything that would give it that burning, underworld vibe.
- I found some pretty cool flame effects that I could attach to the helmet. I put some around the horns, made it look like they were on fire.
- Then, I added some smaller embers and sparks around the base of the helmet, like it was radiating heat.
Completing the Look
Now the helmet was looking pretty good, but it needed the rest of the outfit to match. I didn’t want to go full-on demon, but I still wanted it to look intimidating.
I looked for some dark-colored clothing – mostly black and grey. I found a shirt with some ripped details and some pants that looked like they had been through a battle or two. I also added a cape that was a dark, almost blood-red color. It had a tattered edge, which added to the rough look.
Final Touches
I messed around with the body colors, making my avatar’s skin a darker shade. This made the bright flames on the helmet stand out even more. I also played around with some different faces, finally settling on one that had a kind of angry, determined expression.
Finally, I gave the whole outfit some extra detailed texture.I added a small chain hanging from the helmet. It made the whole thing feel more finished and it looked great!
And that’s it! It took some time, searching and experimenting, but I was pretty happy with how my “hellmet” outfit turned out. It’s all about finding the right pieces and then putting them together in a way that looks cool to you. Have fun making your own!