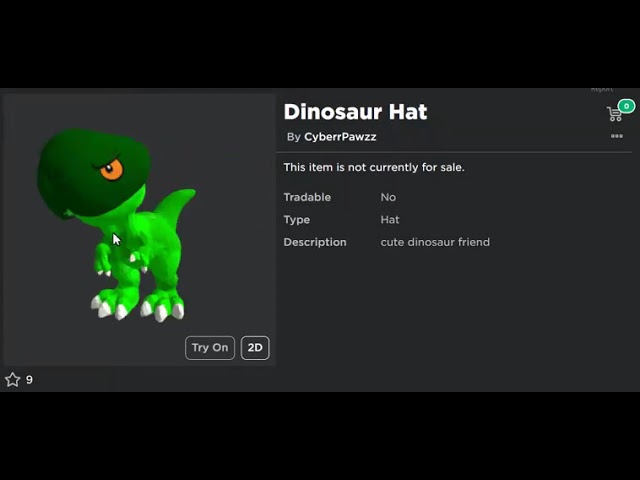
roblox dinosaur hat public ugc
Okay, here’s my blog post about making a dinosaur hat for Roblox, UGC style:
Alright, so I’ve been messing around with Roblox Studio and Blender lately, trying to get into this whole UGC thing. I saw a few people rocking some cool custom hats, and I thought, “Hey, I could probably do that!” I’m no 3D modeling expert, but I’m pretty good at following tutorials and figuring things out. My idea? A dinosaur hat. Specifically, a Triceratops. Because who doesn’t love a good Triceratops?
Getting Started: Blender Basics
First things first, I needed to learn the basics of Blender. I’ve dabbled in it before, but nothing serious. I watched a bunch of YouTube videos – seriously, there are tons of great tutorials out there. I started with the super basic stuff: navigating the interface, adding objects, moving things around, scaling, rotating… you know, the usual.
I created a basic shape, kind of like a dome, for the base of the hat. Then I added some cylinders and started shaping them into horns. It was a lot of pushing and pulling vertices, extruding faces, and generally just playing around until it started to look somewhat like a Triceratops head. It was messy, ngl.
Sculpting and Refining
After I had the basic shapes in place, I used Blender’s sculpting tools to add more detail. This was actually pretty fun. I felt like a real artist, even though my Triceratops looked a little… derpy… at first. I smoothed out some rough edges, added some wrinkles and scales, and generally tried to make it look less like a bunch of random shapes stuck together.
Important Note: Keep your polygon count low! Roblox has limits, and you don’t want your hat to be too heavy. I used the decimate modifier to reduce the number of polygons without making it look terrible. I also learned about retopology the hard way, had to redo the frill because I made a mess.
Texturing: Making it Colorful
Once I was happy with the model, it was time to add some color. I used UV unwrapping to create a flat map of the hat’s surface. Then I used a simple paint program to paint the textures. I gave it some green and brown scales, some beady little eyes, and a bit of a grumpy expression. I went with a simple style, nothing too realistic, as it fit roblox better.
I created a new material and added the texture. I messed with that setting for hours, I swear.
Importing into Roblox Studio
This is where things got a little tricky. I exported the model from Blender as an FBX file. Then, I opened up Roblox Studio and used the “Import 3D” feature. After fumbling a little, my hat finally showed up in the studio. I could finally see all that work pay off a bit.
Fitting and Publishing
The last step was to fit the hat onto a Roblox character and publish it. I used the Avatar Importer plugin to get a dummy character into my scene. I then positioned and scaled the hat until it looked right. I then uploaded the hat, set a price, and… bam! My dinosaur hat was officially on * didn’t immediately make me rich, but it was a win.
This whole process took me a few days, with lots of trial and error. There were moments when I wanted to throw my computer out the window, but I stuck with it. And now, I have a cool dinosaur hat that I made myself. And you can too! It’s not as hard as it looks, just takes some patience and a willingness to learn.